
Installing LAMP Stack Under Ubuntu
This document was originally written by Matt Drake from Digital Ocean (https://www.digitalocean.com/community/users/mdrake)
The original version was found at: https://www.digitalocean.com/community/tutorials/how-to-install-linux-apache-mysql-php-lamp-stack-ubuntu-18-04
I copied it here to keep as a record for the future. This document has the following Steps:
- Installing Apache Web Server
- Installing MySql Database
- Installing SSL Certificates
- Installing WordPress
Introduction
A “LAMP” stack is a group of open-source software that is typically installed together to enable a server to host dynamic websites and web apps. This term is actually an acronym which represents the Linux operating system, with the Apache web server. The site data is stored in a MySQL database, and dynamic content is processed by PHP.
In this guide, we will install a LAMP stack on an Ubuntu 18.04 server.
Prerequisites
In order to complete this tutorial, you will need to have an Ubuntu 18.04 server with a non-root sudo-enabled user account and a basic firewall. This can be configured using our initial server setup guide for Ubuntu 18.04.
Step 1 — Installing Apache and Updating the Firewall
The Apache web server is among the most popular web servers in the world. It’s well-documented and has been in wide use for much of the history of the web, which makes it a great default choice for hosting a website.
Install Apache using Ubuntu’s package manager, apt:
sudo apt update
sudo apt install apache2
Since this is a sudo command, these operations are executed with root privileges. It will ask you for your regular user’s password to verify your intentions.
Once you’ve entered your password, apt will tell you which packages it plans to install and how much extra disk space they’ll take up. Press Y and hit ENTER to continue, and the installation will proceed.
Adjust the Firewall to Allow Web Traffic
Next, assuming that you have followed the initial server setup instructions and enabled the UFW firewall, make sure that your firewall allows HTTP and HTTPS traffic. You can check that UFW has an application profile for Apache like so:
sudo ufw app list
OutputAvailable applications:
  Apache
  Apache Full
  Apache Secure
  OpenSSH
If you look at the Apache Full profile, it should show that it enables traffic to ports 80 and 443:
sudo ufw app info "Apache Full"
OutputProfile: Apache Full
Title: Web Server (HTTP,HTTPS)
Description: Apache v2 is the next generation of the omnipresent Apache web
server.

Ports:
  80,443/tcp
Allow incoming HTTP and HTTPS traffic for this profile:
sudo ufw allow in "Apache Full"
You can do a spot check right away to verify that everything went as planned by visiting your server’s public IP address in your web browser (see the note under the next heading to find out what your public IP address is if you do not have this information already):
http://your_server_ip
You will see the default Ubuntu 18.04 Apache web page, which is there for informational and testing purposes. It should look something like this:
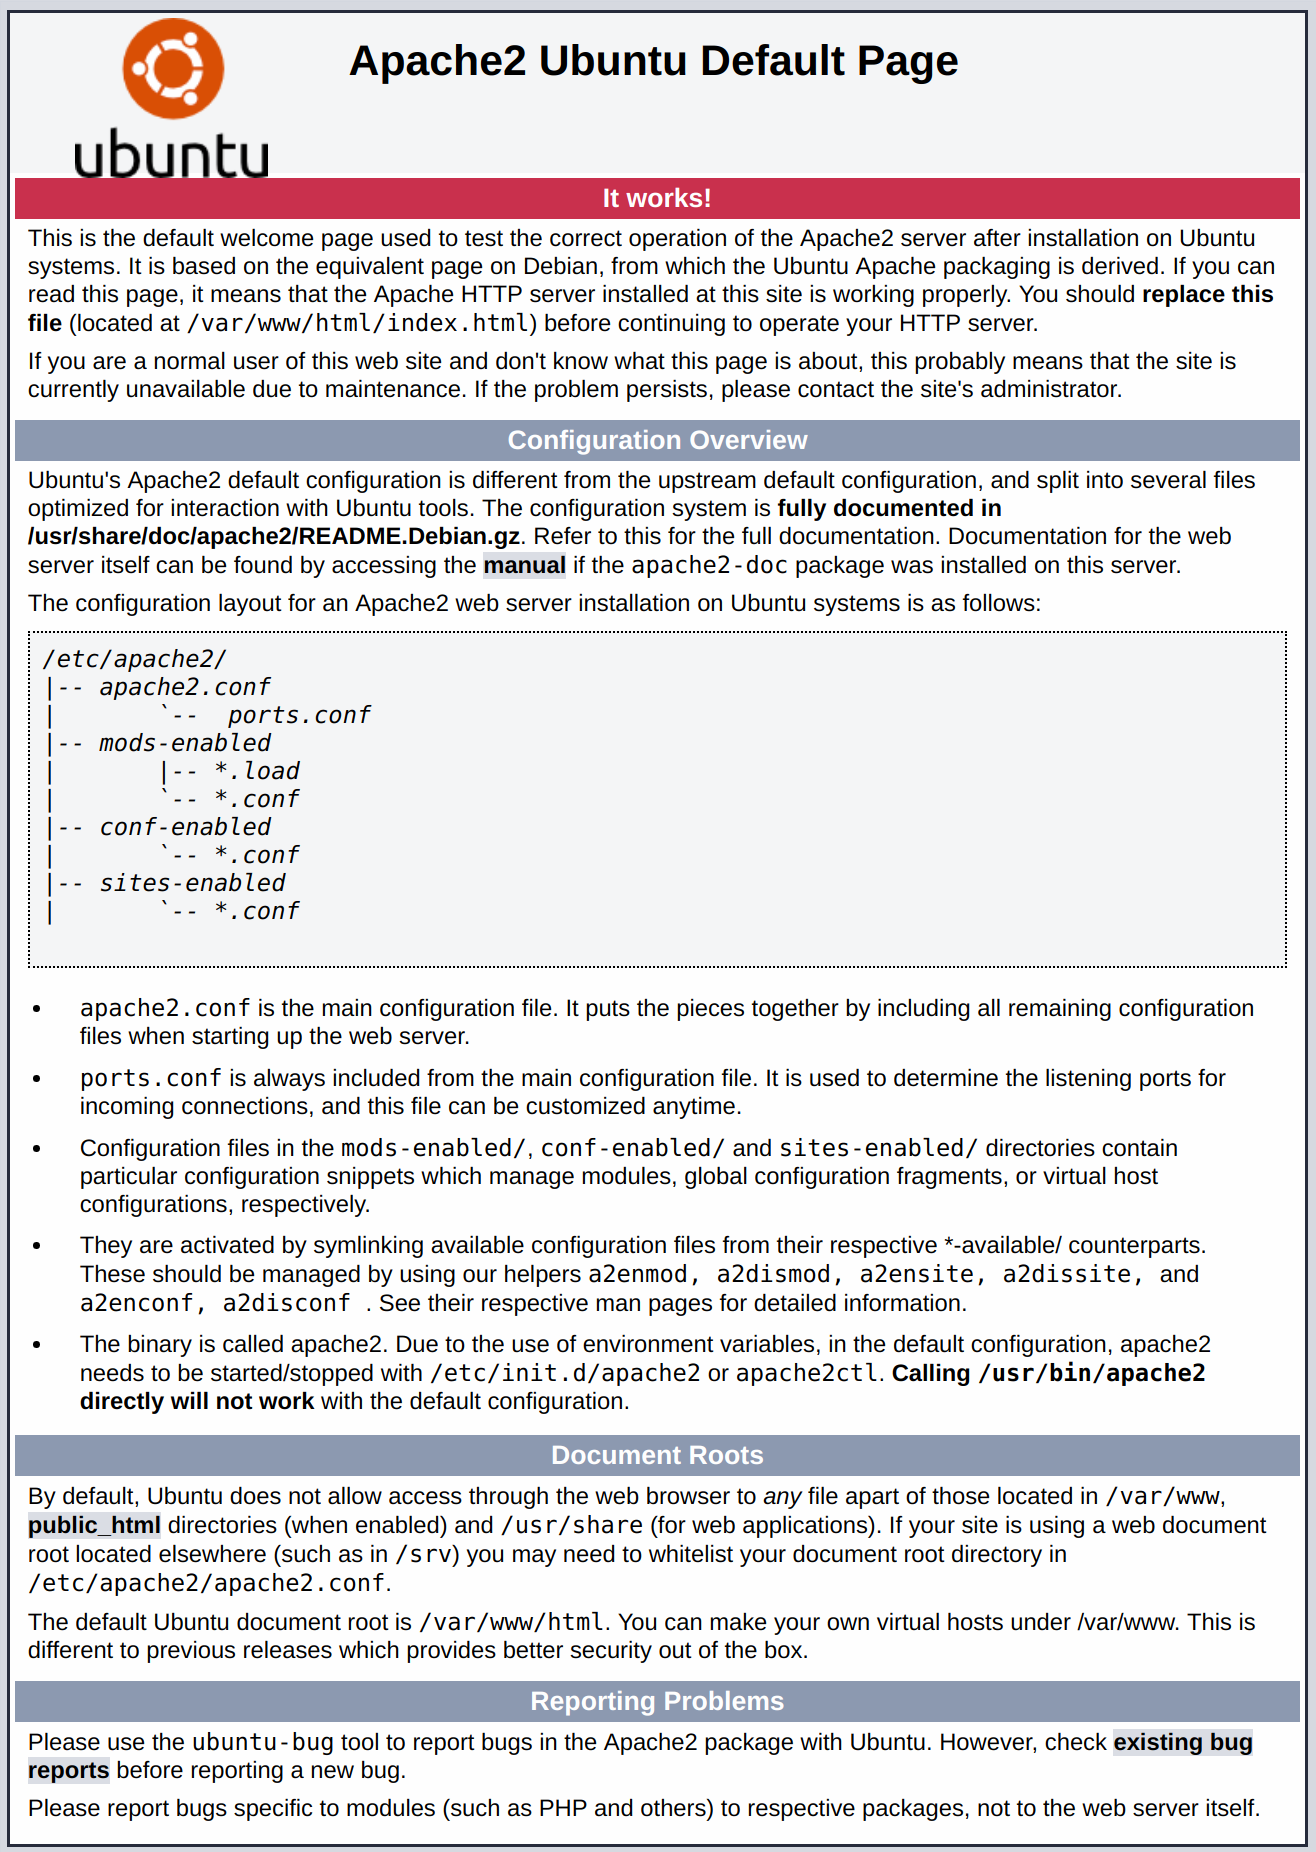
If you see this page, then your web server is now correctly installed and accessible through your firewall.
How To Find your Server’s Public IP Address
If you do not know what your server’s public IP address is, there are a number of ways you can find it. Usually, this is the address you use to connect to your server through SSH.
There are a few different ways to do this from the command line. First, you could use the iproute2 tools to get your IP address by typing this:
ip addr show eth0 | grep inet | awk '{ print $2; }' | sed 's/\/.*$//'
This will give you two or three lines back. They are all correct addresses, but your computer may only be able to use one of them, so feel free to try each one.
An alternative method is to use the curl utility to contact an outside party to tell you how it sees your server. This is done by asking a specific server what your IP address is:
sudo apt install curl
curl http://icanhazip.com
Regardless of the method you use to get your IP address, type it into your web browser’s address bar to view the default Apache page.
Managing the Apache Process
Now that you have your web server up and running, let’s go over some basic management commands.
To stop your web server, type:
sudo systemctl stop apache2
To start the web server when it is stopped, type:
sudo systemctl start apache2
To stop and then start the service again, type:
sudo systemctl restart apache2
If you are simply making configuration changes, Apache can often reload without dropping connections. To do this, use this command:
sudo systemctl reload apache2
By default, Apache is configured to start automatically when the server boots. If this is not what you want, disable this behavior by typing:
sudo systemctl disable apache2
To re-enable the service to start up at boot, type:
sudo systemctl enable apache2
Apache should now start automatically when the server boots again.
Setting Up Virtual Hosts (Recommended)
When using the Apache web server, you can use virtual hosts (similar to server blocks in Nginx) to encapsulate configuration details and host more than one domain from a single server. We will set up a domain called example.com, but you should replace this with your own domain name. To learn more about setting up a domain name with DigitalOcean, see our Introduction to DigitalOcean DNS.
Apache on Ubuntu 18.04 has one server block enabled by default that is configured to serve documents from the /var/www/html directory. While this works well for a single site, it can become unwieldy if you are hosting multiple sites. Instead of modifying /var/www/html, let’s create a directory structure within /var/www for our example.com site, leaving /var/www/html in place as the default directory to be served if a client request doesn’t match any other sites.
Create the directory for example.com as follows, using the -p flag to create any necessary parent directories:
sudo mkdir -p /var/www/example.com/html
Next, assign ownership of the directory with the $USER environmental variable:
sudo chown -R $USER:$USER /var/www/example.com/html
The permissions of your web roots should be correct if you haven’t modified your unmask value, but you can make sure by typing:
sudo chmod -R 755 /var/www/example.com
Next, create a sample index.html page using nano or your favorite editor:
nano /var/www/example.com/html/index.html
Inside, add the following sample HTML:/var/www/example.com/html/index.html
<html>
    <head>
        <title>Welcome to Example.com!</title>
    </head>
    <body>
        <h1>Success!  The example.com server block is working!</h1>
    </body>
</html>
Save and close the file when you are finished.
In order for Apache to serve this content, it’s necessary to create a virtual host file with the correct directives. Instead of modifying the default configuration file located at /etc/apache2/sites-available/000-default.conf directly, let’s make a new one at /etc/apache2/sites-available/example.com.conf:
sudo nano /etc/apache2/sites-available/example.com.conf
Paste in the following configuration block, which is similar to the default, but updated for our new directory and domain name:/etc/apache2/sites-available/example.com.conf
<VirtualHost *:80>
    ServerAdmin admin@example.com
    ServerName example.com
    ServerAlias www.example.com
    DocumentRoot /var/www/example.com/html
    ErrorLog ${APACHE_LOG_DIR}/error.log
    CustomLog ${APACHE_LOG_DIR}/access.log combined
</VirtualHost>
Notice that we’ve updated the DocumentRoot to our new directory and ServerAdmin to an email that the example.com site administrator can access. We’ve also added two directives: ServerName, which establishes the base domain that should match for this virtual host definition, and ServerAlias, which defines further names that should match as if they were the base name.
Save and close the file when you are finished.
Let’s enable the file with the a2ensite tool:
sudo a2ensite example.com.conf
Disable the default site defined in 000-default.conf:
sudo a2dissite 000-default.conf
Next, let’s test for configuration errors:
sudo apache2ctl configtest
You should see the following output:
OutputSyntax OK
Restart Apache to implement your changes:
sudo systemctl restart apache2
Apache should now be serving your domain name. You can test this by navigating to http://example.com, where you should see something like this:

Getting Familiar with Important Apache Files and Directories
Now that you know how to manage the Apache service itself, you should take a few minutes to familiarize yourself with a few important directories and files.
Content
/var/www/html: The actual web content, which by default only consists of the default Apache page you saw earlier, is served out of the/var/www/htmldirectory. This can be changed by altering Apache configuration files.
Server Configuration
/etc/apache2: The Apache configuration directory. All of the Apache configuration files reside here./etc/apache2/apache2.conf: The main Apache configuration file. This can be modified to make changes to the Apache global configuration. This file is responsible for loading many of the other files in the configuration directory./etc/apache2/ports.conf: This file specifies the ports that Apache will listen on. By default, Apache listens on port 80 and additionally listens on port 443 when a module providing SSL capabilities is enabled./etc/apache2/sites-available/: The directory where per-site virtual hosts can be stored. Apache will not use the configuration files found in this directory unless they are linked to thesites-enableddirectory. Typically, all server block configuration is done in this directory, and then enabled by linking to the other directory with thea2ensitecommand./etc/apache2/sites-enabled/: The directory where enabled per-site virtual hosts are stored. Typically, these are created by linking to configuration files found in thesites-availabledirectory with thea2ensite. Apache reads the configuration files and links found in this directory when it starts or reloads to compile a complete configuration./etc/apache2/conf-available/,/etc/apache2/conf-enabled/: These directories have the same relationship as thesites-availableandsites-enableddirectories, but are used to store configuration fragments that do not belong in a virtual host. Files in theconf-availabledirectory can be enabled with thea2enconfcommand and disabled with thea2disconfcommand./etc/apache2/mods-available/,/etc/apache2/mods-enabled/: These directories contain the available and enabled modules, respectively. Files in ending in.loadcontain fragments to load specific modules, while files ending in.confcontain the configuration for those modules. Modules can be enabled and disabled using thea2enmodanda2dismodcommand.
Server Logs
/var/log/apache2/access.log: By default, every request to your web server is recorded in this log file unless Apache is configured to do otherwise./var/log/apache2/error.log: By default, all errors are recorded in this file. TheLogLeveldirective in the Apache configuration specifies how much detail the error logs will contain.
Step 2 — Installing MySQL
Now that you have your web server up and running, it is time to install MySQL. MySQL is a database management system. Basically, it will organize and provide access to databases where your site can store information.
Again, use apt to acquire and install this software:
sudo apt install mysql-server
Note: In this case, you do not have to run sudo apt update prior to the command. This is because you recently ran it in the commands above to install Apache. The package index on your computer should already be up-to-date.
This command, too, will show you a list of the packages that will be installed, along with the amount of disk space they’ll take up. Enter Y to continue.
When the installation is complete, run a simple security script that comes pre-installed with MySQL which will remove some dangerous defaults and lock down access to your database system. Start the interactive script by running:
sudo mysql_secure_installation
This will ask if you want to configure the VALIDATE PASSWORD PLUGIN.
Note: Enabling this feature is something of a judgment call. If enabled, passwords which don’t match the specified criteria will be rejected by MySQL with an error. This will cause issues if you use a weak password in conjunction with software which automatically configures MySQL user credentials, such as the Ubuntu packages for phpMyAdmin. It is safe to leave validation disabled, but you should always use strong, unique passwords for database credentials.
Answer Y for yes, or anything else to continue without enabling.
VALIDATE PASSWORD PLUGIN can be used to test passwords
and improve security. It checks the strength of password
and allows the users to set only those passwords which are
secure enough. Would you like to setup VALIDATE PASSWORD plugin?

Press y|Y for Yes, any other key for No:
If you answer “yes”, you’ll be asked to select a level of password validation. Keep in mind that if you enter 2 for the strongest level, you will receive errors when attempting to set any password which does not contain numbers, upper and lowercase letters, and special characters, or which is based on common dictionary words.
There are three levels of password validation policy:

LOW    Length >= 8
MEDIUM Length >= 8, numeric, mixed case, and special characters
STRONG Length >= 8, numeric, mixed case, special characters and dictionary                  file

Please enter 0 = LOW, 1 = MEDIUM and 2 = STRONG: 1
Regardless of whether you chose to set up the VALIDATE PASSWORD PLUGIN, your server will next ask you to select and confirm a password for the MySQL root user. This is an administrative account in MySQL that has increased privileges. Think of it as being similar to the root account for the server itself (although the one you are configuring now is a MySQL-specific account). Make sure this is a strong, unique password, and do not leave it blank.
If you enabled password validation, you’ll be shown the password strength for the root password you just entered and your server will ask if you want to change that password. If you are happy with your current password, enter N for “no” at the prompt:
Using existing password for root.

Estimated strength of the password: 100
Change the password for root ? ((Press y|Y for Yes, any other key for No) : n
For the rest of the questions, press Y and hit the ENTER key at each prompt. This will remove some anonymous users and the test database, disable remote root logins, and load these new rules so that MySQL immediately respects the changes you have made.
Note that in Ubuntu systems running MySQL 5.7 (and later versions), the root MySQL user is set to authenticate using the auth_socket plugin by default rather than with a password. This allows for some greater security and usability in many cases, but it can also complicate things when you need to allow an external program (e.g., phpMyAdmin) to access the user.
If you prefer to use a password when connecting to MySQL as root, you will need to switch its authentication method from auth_socket to mysql_native_password. To do this, open up the MySQL prompt from your terminal:
sudo mysql
Next, check which authentication method each of your MySQL user accounts use with the following command:
SELECT user,authentication_string,plugin,host FROM mysql.user;
Output+------------------+-------------------------------------------+-----------------------+-----------+
| user             | authentication_string                     | plugin                | host      |
+------------------+-------------------------------------------+-----------------------+-----------+
| root             |                                           | auth_socket           | localhost |
| mysql.session    | *THISISNOTAVALIDPASSWORDTHATCANBEUSEDHERE | mysql_native_password | localhost |
| mysql.sys        | *THISISNOTAVALIDPASSWORDTHATCANBEUSEDHERE | mysql_native_password | localhost |
| debian-sys-maint | *CC744277A401A7D25BE1CA89AFF17BF607F876FF | mysql_native_password | localhost |
+------------------+-------------------------------------------+-----------------------+-----------+
4 rows in set (0.00 sec)
In this example, you can see that the root user does in fact authenticate using the auth_socket plugin. To configure the root account to authenticate with a password, run the following ALTER USER command. Be sure to change password to a strong password of your choosing:
ALTER USER 'root'@'localhost' IDENTIFIED WITH mysql_native_password BY 'password';
Then, run FLUSH PRIVILEGES which tells the server to reload the grant tables and put your new changes into effect:
FLUSH PRIVILEGES;
Check the authentication methods employed by each of your users again to confirm that root no longer authenticates using the auth_socket plugin:
SELECT user,authentication_string,plugin,host FROM mysql.user;
Output+------------------+-------------------------------------------+-----------------------+-----------+
| user             | authentication_string                     | plugin                | host      |
+------------------+-------------------------------------------+-----------------------+-----------+
| root             | *3636DACC8616D997782ADD0839F92C1571D6D78F | mysql_native_password | localhost |
| mysql.session    | *THISISNOTAVALIDPASSWORDTHATCANBEUSEDHERE | mysql_native_password | localhost |
| mysql.sys        | *THISISNOTAVALIDPASSWORDTHATCANBEUSEDHERE | mysql_native_password | localhost |
| debian-sys-maint | *CC744277A401A7D25BE1CA89AFF17BF607F876FF | mysql_native_password | localhost |
+------------------+-------------------------------------------+-----------------------+-----------+
4 rows in set (0.00 sec)
You can see in this example output that the root MySQL user now authenticates using a password. Once you confirm this on your own server, you can exit the MySQL shell:
exit
At this point, your database system is now set up and you can move on to installing PHP, the final component of the LAMP stack.
Step 3 — Installing PHP
PHP is the component of your setup that will process code to display dynamic content. It can run scripts, connect to your MySQL databases to get information, and hand the processed content over to your web server to display.
Once again, leverage the apt system to install PHP. In addition, include some helper packages this time so that PHP code can run under the Apache server and talk to your MySQL database:
sudo apt install php libapache2-mod-php php-mysql
This should install PHP without any problems. We’ll test this in a moment.
In most cases, you will want to modify the way that Apache serves files when a directory is requested. Currently, if a user requests a directory from the server, Apache will first look for a file called index.html. We want to tell the web server to prefer PHP files over others, so make Apache look for an index.phpfile first.
To do this, type this command to open the dir.conf file in a text editor with root privileges:
sudo nano /etc/apache2/mods-enabled/dir.conf
It will look like this:/etc/apache2/mods-enabled/dir.conf
<IfModule mod_dir.c>
    DirectoryIndex index.html index.cgi index.pl index.php index.xhtml index.htm
</IfModule>
Move the PHP index file (highlighted above) to the first position after the DirectoryIndex specification, like this:/etc/apache2/mods-enabled/dir.conf
<IfModule mod_dir.c>
    DirectoryIndex index.php index.html index.cgi index.pl index.xhtml index.htm
</IfModule>
When you are finished, save and close the file by pressing CTRL+X. Confirm the save by typing Y and then hit ENTER to verify the file save location.
After this, restart the Apache web server in order for your changes to be recognized. Do this by typing this:
sudo systemctl restart apache2
You can also check on the status of the apache2 service using systemctl:
sudo systemctl status apache2
Sample Output● apache2.service - LSB: Apache2 web server
   Loaded: loaded (/etc/init.d/apache2; bad; vendor preset: enabled)
  Drop-In: /lib/systemd/system/apache2.service.d
           └─apache2-systemd.conf
   Active: active (running) since Tue 2018-04-23 14:28:43 EDT; 45s ago
     Docs: man:systemd-sysv-generator(8)
  Process: 13581 ExecStop=/etc/init.d/apache2 stop (code=exited, status=0/SUCCESS)
  Process: 13605 ExecStart=/etc/init.d/apache2 start (code=exited, status=0/SUCCESS)
    Tasks: 6 (limit: 512)
   CGroup: /system.slice/apache2.service
           ├─13623 /usr/sbin/apache2 -k start
           ├─13626 /usr/sbin/apache2 -k start
           ├─13627 /usr/sbin/apache2 -k start
           ├─13628 /usr/sbin/apache2 -k start
           ├─13629 /usr/sbin/apache2 -k start
           └─13630 /usr/sbin/apache2 -k start
Press Q to exit this status output.
To enhance the functionality of PHP, you have the option to install some additional modules. To see the available options for PHP modules and libraries, pipe the results of apt search into less, a pager which lets you scroll through the output of other commands:
apt search php- | less
Use the arrow keys to scroll up and down, and press Q to quit.
The results are all optional components that you can install. It will give you a short description for each:
bandwidthd-pgsql/bionic 2.0.1+cvs20090917-10ubuntu1 amd64
  Tracks usage of TCP/IP and builds html files with graphs

bluefish/bionic 2.2.10-1 amd64
  advanced Gtk+ text editor for web and software development

cacti/bionic 1.1.38+ds1-1 all
  web interface for graphing of monitoring systems

ganglia-webfrontend/bionic 3.6.1-3 all
  cluster monitoring toolkit - web front-end

golang-github-unknwon-cae-dev/bionic 0.0~git20160715.0.c6aac99-4 all
  PHP-like Compression and Archive Extensions in Go

haserl/bionic 0.9.35-2 amd64
  CGI scripting program for embedded environments

kdevelop-php-docs/bionic 5.2.1-1ubuntu2 all
  transitional package for kdevelop-php

kdevelop-php-docs-l10n/bionic 5.2.1-1ubuntu2 all
  transitional package for kdevelop-php-l10n
…
:
To learn more about what each module does, you could search the internet for more information about them. Alternatively, look at the long description of the package by typing:
apt show package_name
There will be a lot of output, with one field called Description which will have a longer explanation of the functionality that the module provides.
For example, to find out what the php-cli module does, you could type this:
apt show php-cli
Along with a large amount of other information, you’ll find something that looks like this:
Output…
Description: command-line interpreter for the PHP scripting language (default)
 This package provides the /usr/bin/php command interpreter, useful for
 testing PHP scripts from a shell or performing general shell scripting tasks.
 .
 PHP (recursive acronym for PHP: Hypertext Preprocessor) is a widely-used
 open source general-purpose scripting language that is especially suited
 for web development and can be embedded into HTML.
 .
 This package is a dependency package, which depends on Ubuntu's default
 PHP version (currently 7.2).
…
If, after researching, you decide you would like to install a package, you can do so by using the apt install command like you have been doing for the other software.
If you decided that php-cli is something that you need, you could type:
sudo apt install php-cli
If you want to install more than one module, you can do that by listing each one, separated by a space, following the apt install command, like this:
sudo apt install package1 package2 ...
At this point, your LAMP stack is installed and configured. Before making any more changes or deploying an application, though, it would be helpful to proactively test out your PHP configuration in case there are any issues that should be addressed.
Step 4 — Testing PHP Processing on your Web Server
In order to test that your system is configured properly for PHP, create a very basic PHP script called info.php. In order for Apache to find this file and serve it correctly, it must be saved to a very specific directory, which is called the “web root”.
In Ubuntu 18.04, this directory is located at /var/www/html/. Create the file at that location by running:
sudo nano /var/www/html/info.php
This will open a blank file. Add the following text, which is valid PHP code, inside the file:info.php
<?php
phpinfo();
?>
When you are finished, save and close the file.
Now you can test whether your web server is able to correctly display content generated by this PHP script. To try this out, visit this page in your web browser. You’ll need your server’s public IP address again.
The address you will want to visit is:
http://your_server_ip/info.php
The page that you come to should look something like this:
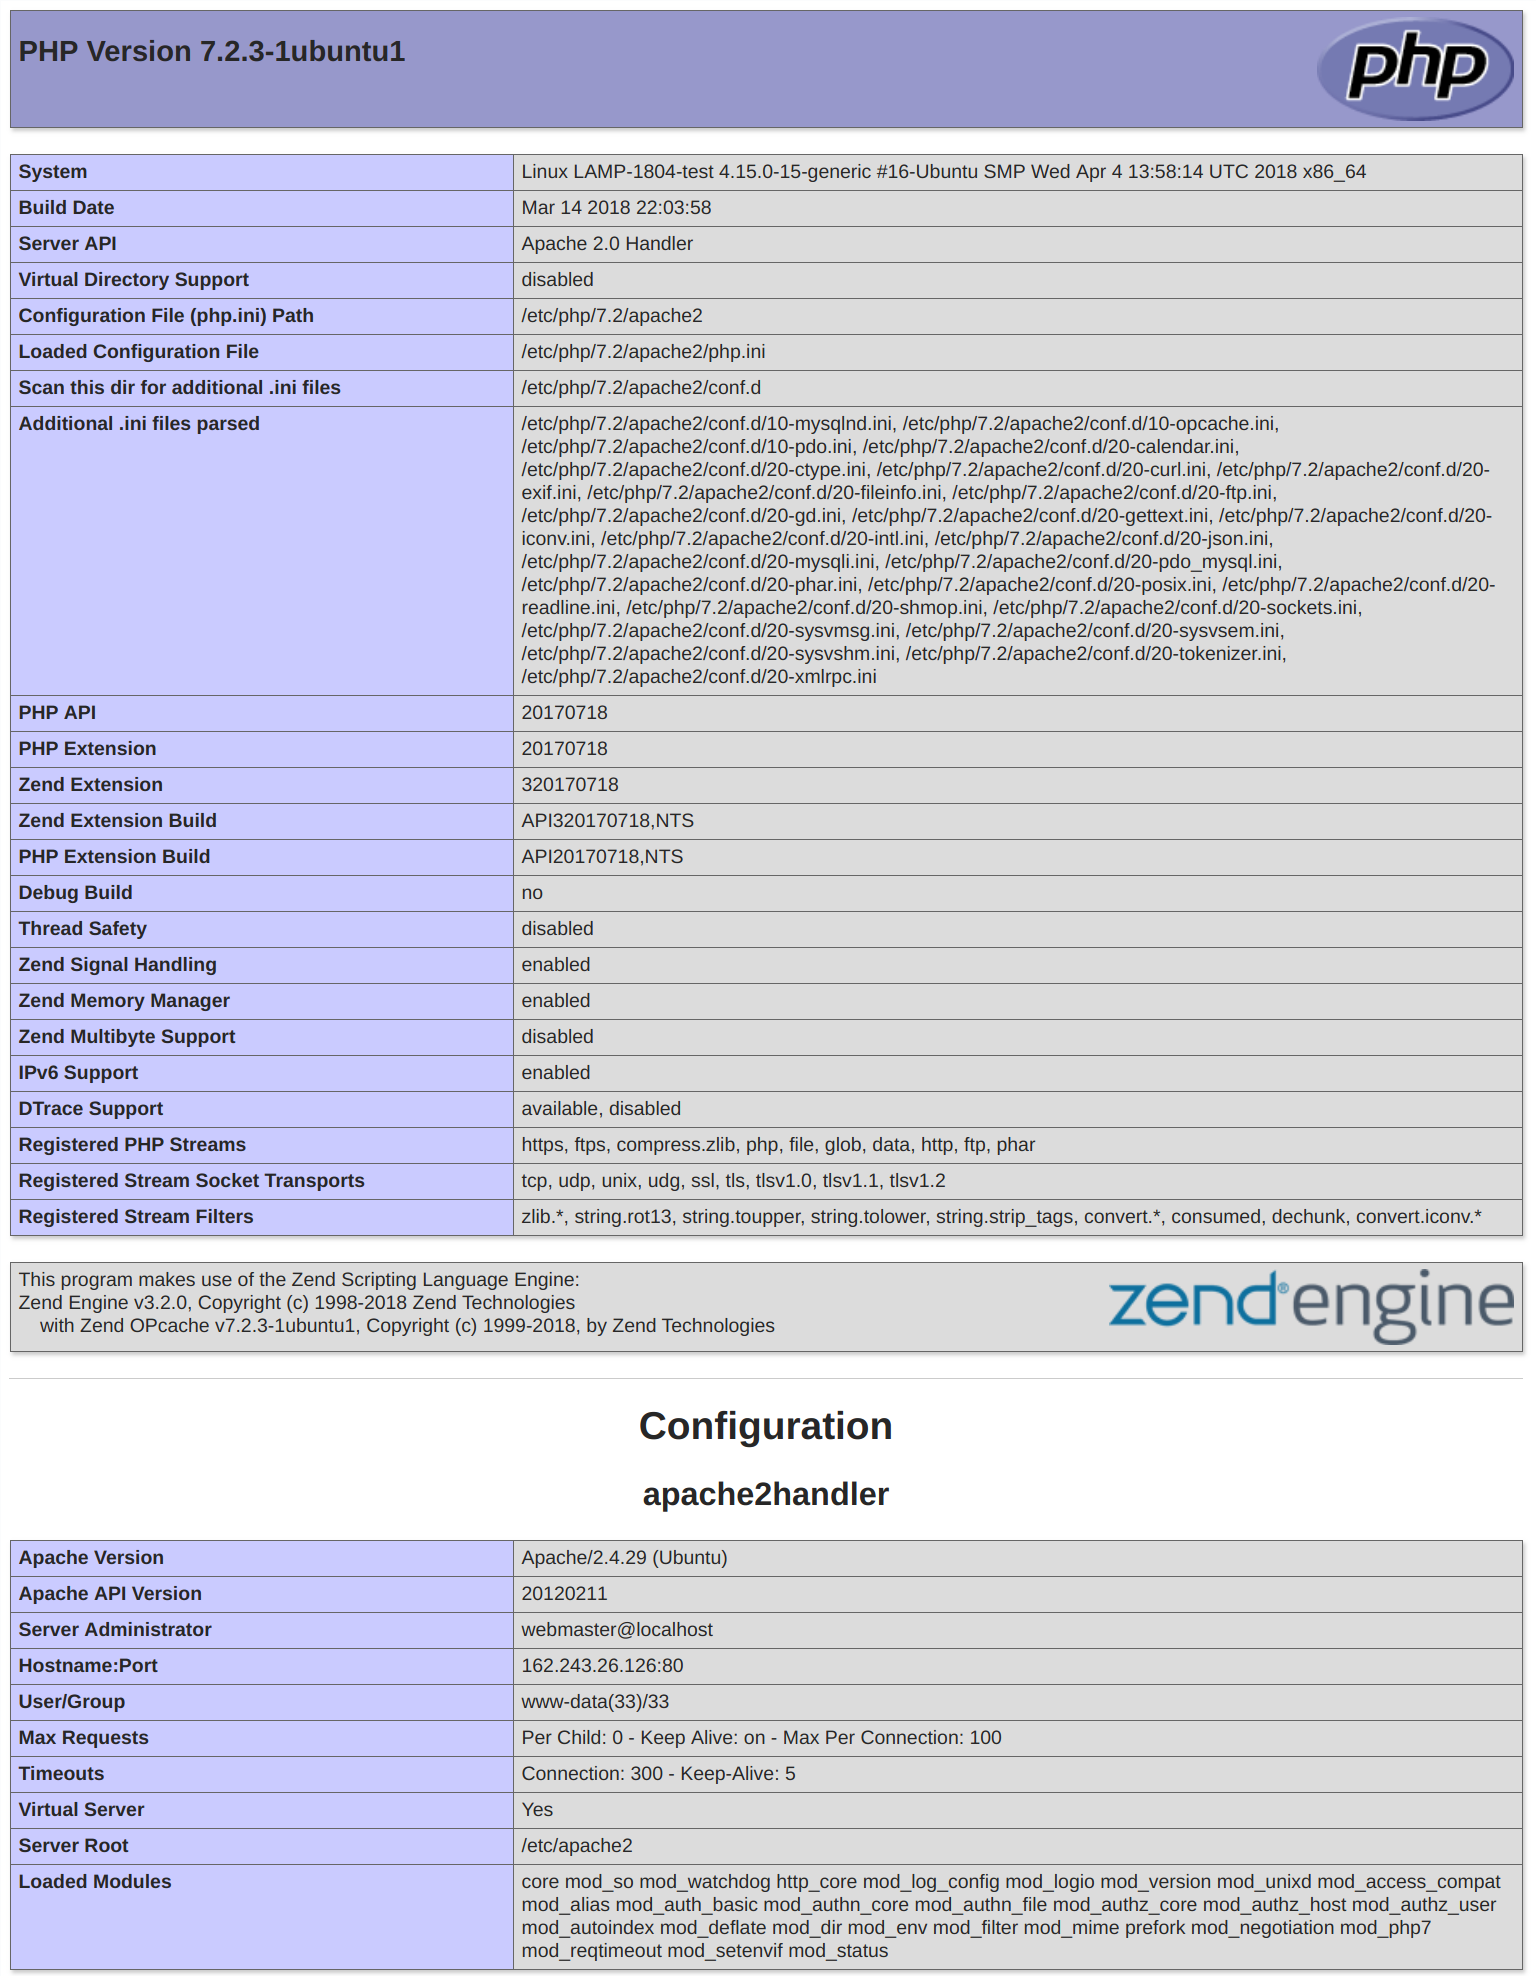
This page provides some basic information about your server from the perspective of PHP. It is useful for debugging and to ensure that your settings are being applied correctly.
If you can see this page in your browser, then your PHP is working as expected.
You probably want to remove this file after this test because it could actually give information about your server to unauthorized users. To do this, run the following command:
sudo rm /var/www/html/info.php
You can always recreate this page if you need to access the information again later.
How To Secure Apache with Let’s Encrypt on Ubuntu 18.04
Introduction
Let’s Encrypt is a Certificate Authority (CA) that provides an easy way to obtain and install free TLS/SSL certificates, thereby enabling encrypted HTTPS on web servers. It simplifies the process by providing a software client, Certbot, that attempts to automate most (if not all) of the required steps. Currently, the entire process of obtaining and installing a certificate is fully automated on both Apache and Nginx.
In this tutorial, you will use Certbot to obtain a free SSL certificate for Apache on Ubuntu 18.04 and set up your certificate to renew automatically.
This tutorial will use a separate Apache virtual host file instead of the default configuration file. We recommend creating new Apache virtual host files for each domain because it helps to avoid common mistakes and maintains the default files as a fallback configuration.
Prerequisites
To follow this tutorial, you will need:
- One Ubuntu 18.04 server set up by following this initial server setup for Ubuntu 18.04 tutorial, including a sudo non-root user and a firewall.
- A fully registered domain name. This tutorial will use example.com throughout. You can purchase a domain name on Namecheap, get one for free on Freenom, or use the domain registrar of your choice.
- Both of the following DNS records set up for your server. You can follow this introduction to DigitalOcean DNS for details on how to add them.
- An A record with
example.compointing to your server’s public IP address. - An A record with
www.example.compointing to your server’s public IP address.
- An A record with
- Apache installed by following How To Install Apache on Ubuntu 18.04. Be sure that you have a virtual host file for your domain. This tutorial will use
/etc/apache2/sites-available/example.com.confas an example.
Step 1 — Installing Certbot
The first step to using Let’s Encrypt to obtain an SSL certificate is to install the Certbot software on your server.
Certbot is in very active development, so the Certbot packages provided by Ubuntu tend to be outdated. However, the Certbot developers maintain a Ubuntu software repository with up-to-date versions, so we’ll use that repository instead.
First, add the repository:
sudo add-apt-repository ppa:certbot/certbot
You’ll need to press ENTER to accept.
Install Certbot’s Apache package with apt:
sudo apt install python-certbot-apache
Certbot is now ready to use, but in order for it to configure SSL for Apache, we need to verify some of Apache’s configuration.
Step 2 — Set Up the SSL Certificate
Certbot needs to be able to find the correct virtual host in your Apache configuration for it to automatically configure SSL. Specifically, it does this by looking for a ServerName directive that matches the domain you request a certificate for.
If you followed the virtual host set up step in the Apache installation tutorial, you should have a VirtualHost block for your domain at /etc/apache2/sites-available/example.com.conf with the ServerNamedirective already set appropriately.
To check, open the virtual host file for your domain using nano or your favorite text editor:
sudo nano /etc/apache2/sites-available/example.com.conf
Find the existing ServerName line. It should look like this:/etc/apache2/sites-available/example.com.conf
...
ServerName example.com;
...
If it does, exit your editor and move on to the next step.
If it doesn’t, update it to match. Then save the file, quit your editor, and verify the syntax of your configuration edits:
sudo apache2ctl configtest
If you get an error, reopen the virtual host file and check for any typos or missing characters. Once your configuration file’s syntax is correct, reload Apache to load the new configuration:
sudo systemctl reload apache2
Certbot can now find the correct VirtualHost block and update it.
Next, let’s update the firewall to allow HTTPS traffic.
Step 3 — Allowing HTTPS Through the Firewall
If you have the ufw firewall enabled, as recommended by the prerequisite guides, you’ll need to adjust the settings to allow for HTTPS traffic. Luckily, Apache registers a few profiles with ufw upon installation.
You can see the current setting by typing:
sudo ufw status
It will probably look like this, meaning that only HTTP traffic is allowed to the web server:
OutputStatus: active

To                         Action      From
--                         ------      ----
OpenSSH                    ALLOW       Anywhere
Apache                     ALLOW       Anywhere
OpenSSH (v6)               ALLOW       Anywhere (v6)
Apache (v6)                ALLOW       Anywhere (v6)
To additionally let in HTTPS traffic, allow the Apache Full profile and delete the redundant Apache profile allowance:
sudo ufw allow 'Apache Full'
sudo ufw delete allow 'Apache'
Your status should now look like this:
sudo ufw status
OutputStatus: active

To                         Action      From
--                         ------      ----
OpenSSH                    ALLOW       Anywhere
Apache Full                ALLOW       Anywhere
OpenSSH (v6)               ALLOW       Anywhere (v6)
Apache Full (v6)           ALLOW       Anywhere (v6)
Next, let’s run Certbot and fetch our certificates.
Step 4 — Obtaining an SSL Certificate
Certbot provides a variety of ways to obtain SSL certificates through plugins. The Apache plugin will take care of reconfiguring Apache and reloading the config whenever necessary. To use this plugin, type the following:
sudo certbot --apache -d example.com -d www.example.com
This runs certbot with the --apache plugin, using -d to specify the names you’d like the certificate to be valid for.
If this is your first time running certbot, you will be prompted to enter an email address and agree to the terms of service. After doing so, certbot will communicate with the Let’s Encrypt server, then run a challenge to verify that you control the domain you’re requesting a certificate for.
If that’s successful, certbot will ask how you’d like to configure your HTTPS settings:
OutputPlease choose whether or not to redirect HTTP traffic to HTTPS, removing HTTP access.
-------------------------------------------------------------------------------
1: No redirect - Make no further changes to the webserver configuration.
2: Redirect - Make all requests redirect to secure HTTPS access. Choose this for
new sites, or if you're confident your site works on HTTPS. You can undo this
change by editing your web server's configuration.
-------------------------------------------------------------------------------
Select the appropriate number [1-2] then [enter] (press 'c' to cancel):
Select your choice then hit ENTER. The configuration will be updated, and Apache will reload to pick up the new settings. certbot will wrap up with a message telling you the process was successful and where your certificates are stored:
OutputIMPORTANT NOTES:
 - Congratulations! Your certificate and chain have been saved at:
   /etc/letsencrypt/live/example.com/fullchain.pem
   Your key file has been saved at:
   /etc/letsencrypt/live/example.com/privkey.pem
   Your cert will expire on 2018-07-23. To obtain a new or tweaked
   version of this certificate in the future, simply run certbot again
   with the "certonly" option. To non-interactively renew *all* of
   your certificates, run "certbot renew"
 - Your account credentials have been saved in your Certbot
   configuration directory at /etc/letsencrypt. You should make a
   secure backup of this folder now. This configuration directory will
   also contain certificates and private keys obtained by Certbot so
   making regular backups of this folder is ideal.
 - If you like Certbot, please consider supporting our work by:

   Donating to ISRG / Let's Encrypt:   https://letsencrypt.org/donate
   Donating to EFF:                    https://eff.org/donate-le
Your certificates are downloaded, installed, and loaded. Try reloading your website using https:// and notice your browser’s security indicator. It should indicate that the site is properly secured, usually with a green lock icon. If you test your server using the SSL Labs Server Test, it will get an A grade.
Let’s finish by testing the renewal process.
Step 5 — Verifying Certbot Auto-Renewal
Let’s Encrypt’s certificates are only valid for ninety days. This is to encourage users to automate their certificate renewal process. The certbot package we installed takes care of this for us by adding a renew script to /etc/cron.d. This script runs twice a day and will automatically renew any certificate that’s within thirty days of expiration.
To test the renewal process, you can do a dry run with certbot:
sudo certbot renew --dry-run
If you see no errors, you’re all set. When necessary, Certbot will renew your certificates and reload Apache to pick up the changes. If the automated renewal process ever fails, Let’s Encrypt will send a message to the email you specified, warning you when your certificate is about to expire.
Conclusion
In this tutorial, you installed the Let’s Encrypt certbot
Step 1 – Creating a MySQL Database and User for WordPress
The first step that we will take is a preparatory one. WordPress uses MySQL to manage and store site and user information. We have MySQL installed already, but we need to make a database and a user for WordPress to use.
To get started, log into the MySQL root (administrative) account by issuing this command:
mysql -u root -p
You will be prompted for the password you set for the MySQL root account when you installed the software.
First, we can create a separate database that WordPress will control. You can call this whatever you would like, but we will be using wordpress in this guide to keep it simple. Create the database for WordPress by typing:
CREATE DATABASE wordpress DEFAULT CHARACTER SET utf8 COLLATE utf8_unicode_ci;
Note: Every MySQL statement must end in a semi-colon (;). Check to make sure this is present if you are running into any issues.
Next, we are going to create a separate MySQL user account that we will use exclusively to operate on our new database. Creating one-function databases and accounts is a good idea from a management and security standpoint. We will use the name wordpressuser in this guide. Feel free to change this if you’d like.
We are going to create this account, set a password, and grant access to the database we created. We can do this by typing the following command. Remember to choose a strong password here for your database user:
GRANT ALL ON wordpress.* TO 'wordpressuser'@'localhost' IDENTIFIED BY 'password';
You now have a database and user account, each made specifically for WordPress. We need to flush the privileges so that the current instance of MySQL knows about the recent changes we’ve made:
FLUSH PRIVILEGES;
Exit out of MySQL by typing:
EXIT;
Step 2 – Installing Additional PHP Extensions
When setting up our LAMP stack, we only required a very minimal set of extensions in order to get PHP to communicate with MySQL. WordPress and many of its plugins leverage additional PHP extensions.
We can download and install some of the most popular PHP extensions for use with WordPress by typing:
sudo apt update
sudo apt install php-curl php-gd php-mbstring php-xml php-xmlrpc php-soap php-intl php-zip
Note: Each WordPress plugin has its own set of requirements. Some may require additional PHP packages to be installed. Check your plugin documentation to discover its PHP requirements. If they are available, they can be installed with apt as demonstrated above.
We will restart Apache to load these new extensions in the next section. If you are returning here to install additional plugins, you can restart Apache now by typing:
sudo systemctl restart apache2
Step 3 – Adjusting Apache’s Configuration to Allow for .htaccess Overrides and Rewrites
Next, we will be making a few minor adjustments to our Apache configuration. Based on the prerequisite tutorials, you should have a configuration file for your site in the /etc/apache2/sites-available/directory. We’ll use /etc/apache2/sites-available/wordpress.conf as an example here, but you should substitute the path to your configuration file where appropriate.
Additionally, we will use /var/www/wordpress as the root directory of our WordPress install. You should use the web root specified in your own configuration.
Note: It’s possible you are using the 000-default.conf default configuration (with /var/www/html as your web root). This is fine to use if you’re only going to host one website on this server. If not, it’s best to split the necessary configuration into logical chunks, one file per site.
Enabling .htaccess Overrides
Currently, the use of .htaccess files is disabled. WordPress and many WordPress plugins use these files extensively for in-directory tweaks to the web server’s behavior.
Open the Apache configuration file for your website:
sudo nano /etc/apache2/sites-available/wordpress.conf
To allow .htaccess files, we need to set the AllowOverride directive within a Directory block pointing to our document root. Add the following block of text inside the VirtualHost block in your configuration file, being sure to use the correct web root directory:/etc/apache2/sites-available/wordpress.conf
<Directory /var/www/wordpress/>
    AllowOverride All
</Directory>
When you are finished, save and close the file.
Enabling the Rewrite Module
Next, we can enable mod_rewrite so that we can utilize the WordPress permalink feature:
sudo a2enmod rewrite
Enabling the Changes
Before we implement the changes we’ve made, check to make sure we haven’t made any syntax errors:
sudo apache2ctl configtest
The output might have a message that looks like this:
OutputAH00558: apache2: Could not reliably determine the server's fully qualified domain name, using 127.0.1.1. Set the 'ServerName' directive globally to suppress this message
Syntax OK
If you wish to suppress the top line, just add a ServerName directive to your main (global) Apache configuration file at /etc/apache2/apache2.conf. The ServerName can be your server’s domain or IP address. This is just a message however and doesn’t affect the functionality of our site. As long as the output contains Syntax OK, you are ready to continue.
Restart Apache to implement the changes:
sudo systemctl restart apache2
Next, we will download and set up WordPress itself.
Step 4 – Downloading WordPress
Now that our server software is configured, we can download and set up WordPress. For security reasons in particular, it is always recommended to get the latest version of WordPress from their site.
Change into a writable directory and then download the compressed release by typing:
cd /tmp
curl -O https://wordpress.org/latest.tar.gz
Extract the compressed file to create the WordPress directory structure:
tar xzvf latest.tar.gz
We will be moving these files into our document root momentarily. Before we do, we can add a dummy .htaccess file so that this will be available for WordPress to use later.
Create the file by typing:
touch /tmp/wordpress/.htaccess
We’ll also copy over the sample configuration file to the filename that WordPress actually reads:
cp /tmp/wordpress/wp-config-sample.php /tmp/wordpress/wp-config.php
We can also create the upgrade directory, so that WordPress won’t run into permissions issues when trying to do this on its own following an update to its software:
mkdir /tmp/wordpress/wp-content/upgrade
Now, we can copy the entire contents of the directory into our document root. We are using a dot at the end of our source directory to indicate that everything within the directory should be copied, including hidden files (like the .htaccess file we created):
sudo cp -a /tmp/wordpress/. /var/www/wordpress
Step 5 – Configuring the WordPress Directory
Before we do the web-based WordPress setup, we need to adjust some items in our WordPress directory.
Adjusting the Ownership and Permissions
One of the big things we need to accomplish is setting up reasonable file permissions and ownership.
We’ll start by giving ownership of all the files to the www-data user and group. This is the user that the Apache webserver runs as, and Apache will need to be able to read and write WordPress files in order to serve the website and perform automatic updates.
Update the ownership with chown:
sudo chown -R www-data:www-data /var/www/wordpress
Next we will run two find commands to set the correct permissions on the WordPress directories and files:
sudo find /var/www/wordpress/ -type d -exec chmod 750 {} \;
sudo find /var/www/wordpress/ -type f -exec chmod 640 {} \;
These should be a reasonable permissions set to start with. Some plugins and procedures might require additional tweaks.
Setting up the WordPress Configuration File
Now, we need to make some changes to the main WordPress configuration file.
When we open the file, our first order of business will be to adjust some secret keys to provide some security for our installation. WordPress provides a secure generator for these values so that you do not have to try to come up with good values on your own. These are only used internally, so it won’t hurt usability to have complex, secure values here.
To grab secure values from the WordPress secret key generator, type:
curl -s https://api.wordpress.org/secret-key/1.1/salt/
You will get back unique values that look something like this:
Warning! It is important that you request unique values each time. Do NOT copy the values shown below!
Outputdefine('AUTH_KEY',         '1jl/vqfs<XhdXoAPz9 DO NOT COPY THESE VALUES c_j{iwqD^<+c9.k<J@4H');
define('SECURE_AUTH_KEY',  'E2N-h2]Dcvp+aS/p7X DO NOT COPY THESE VALUES {Ka(f;rv?Pxf})CgLi-3');
define('LOGGED_IN_KEY',    'W(50,{W^,OPB%PB<JF DO NOT COPY THESE VALUES 2;y&,2m%3]R6DUth[;88');
define('NONCE_KEY',        'll,4UC)7ua+8<!4VM+ DO NOT COPY THESE VALUES #`DXF+[$atzM7 o^-C7g');
define('AUTH_SALT',        'koMrurzOA+|L_lG}kf DO NOT COPY THESE VALUES  07VC*Lj*lD&?3w!BT#-');
define('SECURE_AUTH_SALT', 'p32*p,]z%LZ+pAu:VY DO NOT COPY THESE VALUES C-?y+K0DK_+F|0h{!_xY');
define('LOGGED_IN_SALT',   'i^/G2W7!-1H2OQ+t$3 DO NOT COPY THESE VALUES t6**bRVFSD[Hi])-qS`|');
define('NONCE_SALT',       'Q6]U:K?j4L%Z]}h^q7 DO NOT COPY THESE VALUES 1% ^qUswWgn+6&xqHN&%');
These are configuration lines that we can paste directly in our configuration file to set secure keys. Copy the output you received now.
Now, open the WordPress configuration file:
sudo nano /var/www/wordpress/wp-config.php
Find the section that contains the dummy values for those settings. It will look something like this:/var/www/wordpress/wp-config.php
. . .

define('AUTH_KEY',         'put your unique phrase here');
define('SECURE_AUTH_KEY',  'put your unique phrase here');
define('LOGGED_IN_KEY',    'put your unique phrase here');
define('NONCE_KEY',        'put your unique phrase here');
define('AUTH_SALT',        'put your unique phrase here');
define('SECURE_AUTH_SALT', 'put your unique phrase here');
define('LOGGED_IN_SALT',   'put your unique phrase here');
define('NONCE_SALT',       'put your unique phrase here');

. . .
Delete those lines and paste in the values you copied from the command line:/var/www/wordpress/wp-config.php
. . .

define('AUTH_KEY',         'VALUES COPIED FROM THE COMMAND LINE');
define('SECURE_AUTH_KEY',  'VALUES COPIED FROM THE COMMAND LINE');
define('LOGGED_IN_KEY',    'VALUES COPIED FROM THE COMMAND LINE');
define('NONCE_KEY',        'VALUES COPIED FROM THE COMMAND LINE');
define('AUTH_SALT',        'VALUES COPIED FROM THE COMMAND LINE');
define('SECURE_AUTH_SALT', 'VALUES COPIED FROM THE COMMAND LINE');
define('LOGGED_IN_SALT',   'VALUES COPIED FROM THE COMMAND LINE');
define('NONCE_SALT',       'VALUES COPIED FROM THE COMMAND LINE');

. . .
Next, we need to modify some of the database connection settings at the beginning of the file. You need to adjust the database name, the database user, and the associated password that we configured within MySQL.
The other change we need to make is to set the method that WordPress should use to write to the filesystem. Since we’ve given the web server permission to write where it needs to, we can explicitly set the filesystem method to “direct”. Failure to set this with our current settings would result in WordPress prompting for FTP credentials when we perform some actions.
This setting can be added below the database connection settings, or anywhere else in the file:/var/www/wordpress/wp-config.php
. . .

define('DB_NAME', 'wordpress');

/** MySQL database username */
define('DB_USER', 'wordpressuser');

/** MySQL database password */
define('DB_PASSWORD', 'password');

. . .

define('FS_METHOD', 'direct');
Save and close the file when you are finished.
Step 6 – Completing the Installation Through the Web Interface
Now that the server configuration is complete, we can complete the installation through the web interface.
In your web browser, navigate to your server’s domain name or public IP address:
https://server_domain_or_IP
Select the language you would like to use:
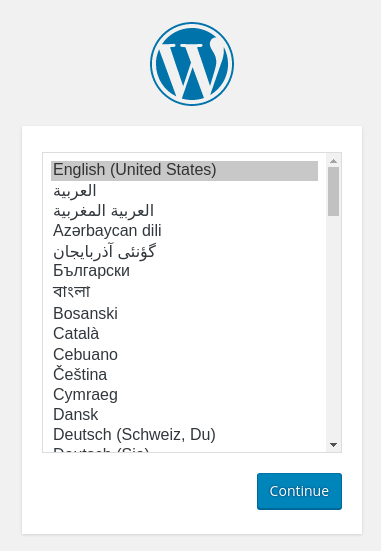
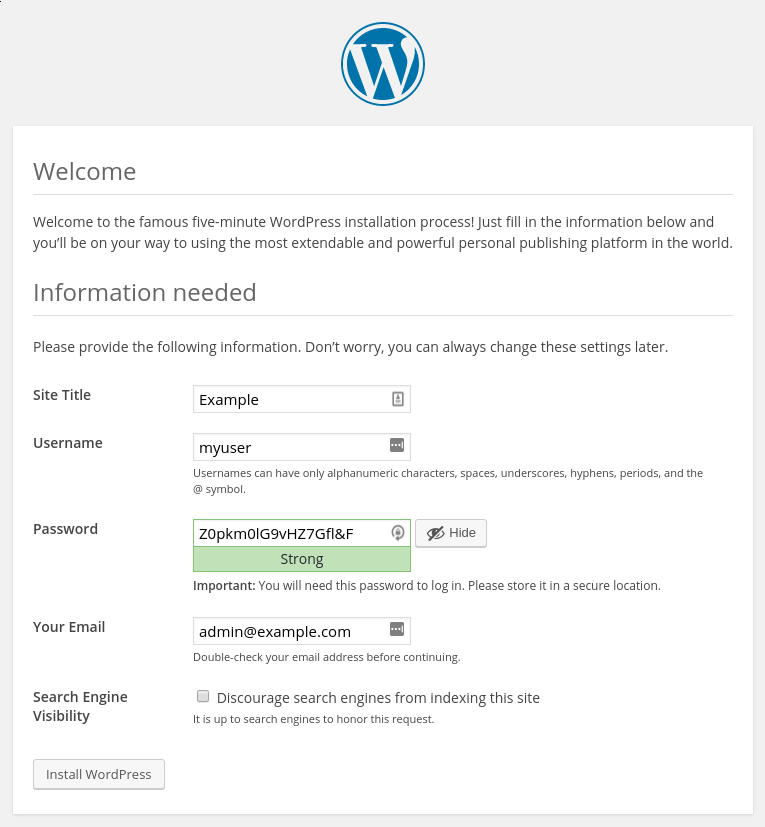
Next, you will come to the main setup page.
Select a name for your WordPress site and choose a username (it is recommended not to choose something like “admin” for security purposes). A strong password is generated automatically. Save this password or select an alternative strong password.
Enter your email address and select whether you want to discourage search engines from indexing your site:
When you click ahead, you will be taken to a page that prompts you to log in:

Once you log in, you will be taken to the WordPress administration dashboard:
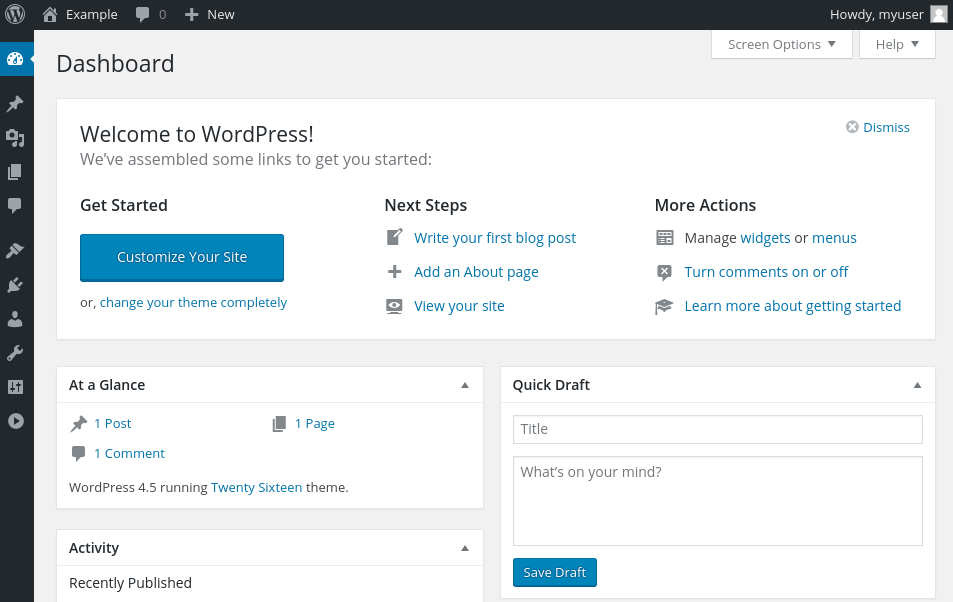
Conclusion
WordPress should be installed and ready to use! Some common next steps are to choose the permalinks setting for your posts (can be found in Settings > Permalinks) or to select a new theme (in Appearance > Themes). If this is your first time using WordPress, explore the interface a bit to get acquainted with your new CMS.